How To Block Facebook’s Face Recognition And Turn Off Facebook Facial Recognition
Well Facebook has updated their privacy settings again. And added new features all in the best interest of their users. It is not uncommon for Facebook to make drastic changes to their interface, platform and policies, they have been at it since the company was founded. (for those of you who use Facebook for business… Make sure you have a plan “B” for when they decide to shut you out)
So what is this new thing?
It is making photo tagging creepier easier. Facebook is using technology to automatically tag you and your friends in your online Facebook photos. Real cool huh?
Facebook has recently enabled “tag suggestions” to many of its users around the world, which means your friends will be alerted if someone uploads an image that Facebook thinks contains your face. They’ll be invited and asked to tag it, and then your Facebook ID will be associated with that image.
Well the best part is, in true Facebook style, the service is opt-out meaning that the more than half a billion Facebook users will automatically have facial recognition turned on. You will have to manually opt out of the service. Because it is in the best interest of the users to be automatically recognized and documented and tracked by a computer system owned and operated by a private company.
So with that being said, as we all voluntarily continue to build “Big Brother” lets go through the simple 9 step Facebook Facial Recognition opt-out procedure:
- Under the “Account” drop-down menu at the top-right of of the page, click “Privacy settings.“
- On the next page in the “Sharing on Facebook” section click on “Custom“
- Then click on the blue pencil at the bottom and hit “customize settings“
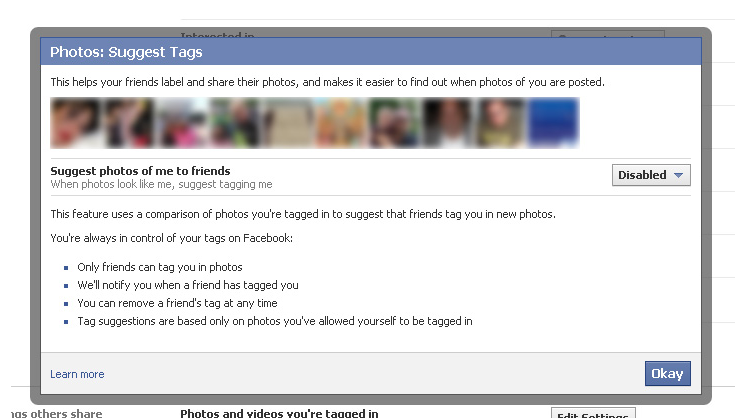
- In the next window scroll down to the “Things others share” section and the third list item, “Suggest photos of me to friends.“
- Click on the “Edit Settings” button,
- In the pop-up window “enabled” will be selected. click the enabled button and select “disabled” from the dropdown.
- Click “Okay” to close the pop-up
That is it. Relatively simple, if you know where to go through the massive maze of options for your privacy settings.
Categorized in: Social Media Marketing
Published On: Jun 13, 2011